Search This Blog

Monday 25 May 2015

Butler's Tray Part 2
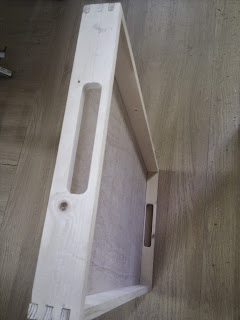
After making the mortice rail, cutting the handle holes on the woodrat became a simple job, with little scope for a botched cut.

The final tray handles are like this:


A view of the entire tray:

And a view of the two handle cutouts. I cut them separately rather than stacking them on the woodrat. There are stops for the shorter distance on the woodrat, the longer dimension is set up using pencil marks on the body and travelling part.


Aluminium Woodrat Mortice Rail

The butler's tray project highlighted a lack of my ability to use the woodrat for mortising. Although the wooden mortice rail is useful for some work, cutting the handle holes for the butler's tray would be very difficult using it. Woodrat have an MR4 mortice rail which is an aluminium channel with some holes cut in it. 
I have a milling machine, so decided to make one rather than buy one.

After a trip or two to Metal Supermarket in Southampton, I had a one metre length of 2mm aluminium channel 90mm wide and 50mm deep. The dimensions are approximate as the channel was sized in imperial units.

IU drilled two holes in the back face at the spacing that the clamps holes on the woodrat are set at, these are used to fix the rail to the woodrat. Two countersunk M8 screws do this, so the hols need to be countersunk. I cut two holes on the front face so that I could do this, this appears to be the same on the MR4. The tool passes through the front face through these holes.

Some tapped M8 holes at the front of the rail are used to clamp the workpiece in the rail. The MR4 has handles for this, I'm using bolts for now.

The countersunk screw and access hole can be seen here:


You can see the clamp bolts here and the clearance between the rail and the base plate of the woodrat. This gap may be a bit large, for some jobs the rail would be better arranged if it was higher. I may create another set of countersunk holes that are lower:


One of the advantages of making the rail is that I can add more holes here and there as needed, without feeling bad about cutting into an expensive MR4 rail...

Saturday 16 May 2015

Woodrat Mortise Rail A

I've had the woodrat for quite a while now (so long that the model I have, the WR5, isn't sold any more). I've used it for all sorts of things, but as I didn't buy or make the mortising accessories I never used it for slots and so on. I used a router table for those jobs. There was a lot of that in the plantation shutters.

So, after failing to cut simple handholds for the butlers tray, I have decided to make some accessories for the woodrat. First on the list is the mortise rail that is mentioned in the woodrat manual. This is a wooden mortise rail that can be used to hold workpieces along the main body of the woodrat.

I made this from a piece of wood from the old garage roof and a some plywood.


The uprights are clamped in the woodrat clamps, the holes are for putting the feet of workpiece clamps through the plywood board.

Butlers Tray

I've been requested to make a butler's tray. This is a simple rectangular tray with simple cutouts for hand holds. A piece of plywood forms the base, and four small pieces of wood are used for the sides:


They will fix together like this:


The four edges are fixed together using finger joints. This is extremely easy on the woodrat.


I also routed a slot along the bottom edge of all four side pieces, the plywood base slots into this.


The side edges now need a cutout as a hand hold.  Unfortunately the test piece didn't go well. I have no secure way to cut what are essentially mortises on the woodrat. So, I have decided to make some accessories for the woodrat.
The tray will have to wait until I have finished those, then I'll be able to finish it.


Friday 15 May 2015

Servo Driven Brass Pressure Gauge

While wandering about a junk shop a while back I found two brass pressure gauges. Thinking that they would be an interesting way to display the water level in the rainwater harvesting system I looked at adding a servo control.


As the larger gauge has more space I started with that one for a conversion. The brass was a bit tarnished so I stripped the gauge down and polished anything that was polishable:

The bourdan tube that is used to measure the pressure (the circular tube attached to the bulky brass tube at the bottom left) takes up a lot of space in the gauge so I decided to remove it. This means the gauge won't easily measure pressure again, but that use is unlikely in the future. I made a bracket from some sheet steel for the servo, and the result is below:


This shows a piece of wire connecting the servo arm to the needle mechanism as I was concerned that a rigid link would jam. Once this flexible link was tested and found to work, I tried a rigid link:


This was fine as there was enough bend in the link to cater for the arc swept by the servo arm.

This video shows the gauge being driven from the PWM output of an arduino:


This is a front view of the gauge operating:


Drain Cover

Round the back of the house, one of the downpipes from the roof goes into a crude hole in the path.

 As well as looking untidy, the hole collects leaves during autumn, and other rubbish during other seasons. A cover was requested to stop this happening.
At first I thought of using some metal from an old stove that we had lying about (I'd noticed it wasn't rusting, even after years outside) but after cutting it into a sheet, decided that it maybe wasn't quite suitable. As we have a larg amount of slate left over from various jobs, I gave that a try instead.

The slate tile cut quite well using a diamond tile saw, following various lines was pretty easy:


The slate is now cut into two parts, with a cutout for the downpipe:


To drill some holes for fixing to some wooden battens, I used a masonry drill, followed by a larger twist drill for countersinking (This drill is probably pretty blunt now).


Some batten cut to size provides a frame for the slate to lie on, it also holds the two parts together when placed round the downpipe:


And the final cover:


We'll see in the autumn how well it does its job. It looks neater anyway.