Search This Blog

Wednesday, 27 February 2019

Third Generation

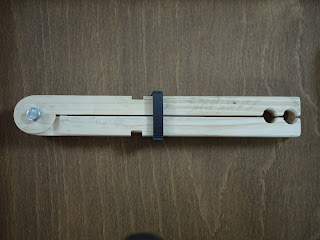
Due to some selective forgetting, I had ignored some requirements for the second generation tongs. I think what I had done was to focus on the request that the next generation be slimmer and had forgotten that it should also be shorter. A few minutes with the bandsaw and the second generation tong became a third generation, and shorter:


Feedback from the second generation was that the smaller 'teeth' on the end:


weren't as good as the first generation:


So, I added teeth to the third generation that matched the second:


Another requirement that I had forgotten, but remembered once I had been reminded, was to have a clamp of some kind that could be used to hold things in the tongs without having to apply pressure for long periods of time. I had a think about this and was wondering about a hook arrangement, or levers of some kind. The clamp has to take into account different thicknesses of material to be clamped and allow tightening of some kind. Lever and hooks and so on were getting complicated. then i thought about doing this:


This is a rectangular 3D printed clamp that slides towards the end of the tongs as you clamp. As there is something in the tongs to clamp, the tong arms are at an angle so the clamp ring has a tightening action as you slide it up:


I then realised that you can use the clamp ring as a stop for the tong arms, so the leather stop can be removed. Excellent, the design is getting simpler.


Then, to stop the ring from dropping off the arms, I made a little home for it using a pair of recesses cut into the arms:


The ring was a bit big and probably wouldn't clamp thin items well, so I printed two more, successively smaller, rings and finally got one that will clamp down to a mall gap at the end of the tongs:


Because the ring was now smaller it was difficult to get it to leave home as the recesses had square sides. A bit of sanding and I had given one side of the recess a slope. This also allows clamping to be applied gradually, rather than the instant application needed when slipping the ring over the square edge.


This is the third generation in the closed position.


Actually, is this the third generation, or the fifth generation?

Thursday, 21 February 2019

Evolution

Of designs. About a year and a half ago I made some 'distance increasers', or a pair of tongs. The blog entry is here:

First generation

and a picture of the tongs are here:


 In the best tradition of evolution, there was some selection pressure from the user of these tongs. The first problem was the size. My hands are bigger than the person using these and, while they fit me fine, they were a bit too chunky. Secondly, my handmade hinge, while an outstanding item in it's design and execution, did unfortunately have the side effect of being painful to have around.
The same goes for the stop on the side, which prevents the spring from popping out if the tong are opened too far.

So, the second generation:


 Altogether less chunky and softer in features. The hinge is now part of the wooden arms, and the stop is a leather strap between the two arms:


The hinge is simpler and should be less sharp. This was pretty easy to do on the bandsaw:


We'll have to see how the second generation goes...


Monday, 18 February 2019

Screwdriver Test and Stand

I've had the odd small screwdriver set, but never been very impressed with the quality. I have been taking watches apart recently and finally got totally hacked off with the rubbish screwdrivers. So, I decided to throw some money at the problem and buy some expensive screwdrivers to see if they were worth it.
I've bought a cheap set of watchmakers screwdrivers and the quality was a bit better, but still not nice to just handle and use.

So, a large-ish bill later and I was the owner of a selection of screwdrivers from a variety of manufacturers: Bergeon, AF, and some Cousins ones. they are all pretty nice, and do indeed have that 'nice to handle' quality.

Anyway, I had nothing to hold them while working, I could have bought a stand, but my wallet was tired, so I decided to make one. Some 3D modelling and printing and ta da:


Can you spot the screwdriver that cost £37?  Hint: the price includes a barrel.

The stand is made from two parts and uses a 608 bearing to join the two parts:


The screwdrivers themselves seemed to come in two basic sizes, with two diameters of the end of the handles. So, the holes in the top part also come in two different sizes to match:


The screwdrivers are held by the handles, the bits sit in a cone shaped recess in the top.

One thing it needs is a heavier base. I think I may have a go at machining a metal base so that the insertion and removal of drivers is a true one-handled operation.

Friday, 15 February 2019

A 3D Printer is a Ruler

What is a 3D printer for? Well, it can do things that are difficult to do other ways, or would take a long time. This morning I was looking at fitting drawer fronts to a table. I needed to hold the drawer front with a fixed gap around the edges so that there was a uniform clearance. I had a quick think and knocked up some wooden shims using the bandsaw. They were OK, but then I found that the gap at the bottom of the drawer front was a bit different to the sides. So I needed a couple more. So I made some more on the bandsaw. Then I found I needed two more to make the front stable while shimming it up. OK, off to the 3D printer. Some SCAD later (10mins or so):

//
// Marking aid for table shelf runners
//
//

// 25mm height for runners

if (0)
{
difference()
{
cube([40, 10, 30], center=true);
    translate([0, 2.55, 30.2/2-25/2])
cube([45, 5, 25], center=true);
}

}

// shim to keep distance consistent when attaching sides to drawer front
if(1)
{
    ov = 7;
    th = 3.5/2;
    th =1;
    d= 100/2-ov/2+th;

difference()
{
cube([20, 7, 30], center=true);
    translate([0, d, 30.2/2-25/2])
cube([25, 100, 25], center=true);
}

}


Quick and dirty. Note the shim distance of 3.5/2. That's tricky on the bandsaw, or in wood at all. Not a problem on the 3D printer.
A bit of printing later (two printers now, so simultaneously on both) and we have shims:


The two different sizes look like this when they are resting:


Of course, you can do other things. Also printed this morning were two pin vice holders:

(The sharpie holder was done weeks ago).


Friday, 8 February 2019

First Hair Cut

It was the time for the first hair cut for the little one, and being a squirrel type person that doesn't throw much away until it has been used a couple of times, it seemed a bit wasteful to just throw the hair cutting away. After all, we won't have hair from the first hair cut again.

Then I came across this page:

https://allabout-japan.com/en/article/3553/

It seemed a good idea to keep the hair and attempt to make a brush with it sometime. Then I came across this site:

http://www.beyondcalligraphy.com/calligraphy_brush_hairs.html

which mentions that human hair brushes is only made from the hair of babies. The hair I had collected is just such hair. "What was the reason for this?" I thought. Off to the microscope to have a look at a hair.

This is the cut end at 10x:


You can see the flat chopped off end, and also some features that look like growth rings. This is a less clear higher (20x) magnification view:


A view at 40x:

The uncut end, which is the first part of the hair that grew looks like this (also at 20x):


This end is much thinner and doesn't have a sharp cutoff. This makes it much finer for brushmaking, I assume, and may be why this is used rather than other, later, cuts.

Thursday, 7 February 2019

Crazy Paving Shelf

One of the advantages of having a few tools around is that you can do things quicker than with just hand tools. Example: I wanted to make a shelf, but rather than cut a large piece of wood down, I joined small offcuts I had lying around into a larger plank. This was pretty easy using the band saw, tracing the shape needed from one piece to a piece below it. I then biscuit jointed where possible to provide more strength. Everything was then glued together.

After gluing, I ran it through the thicknesser to get everything flat then cut to size with the band saw again.

The glued shelf:


I then filled gaps with a mixture of PVA glue and  sawdust from the band saw. Once dry it was sanded thoroughly.

This all took time, but not that much. I managed to use offcuts that I would have probably eventually burnt. I'm going to try this again on more shelves I need to put up. Hopefully it will clear some space that the offcuts are taking up.