Search This Blog

Monday, 25 December 2017

Making Tins More Useful

The food for the ongoing project comes in large metal tins. They look like they might be useful for storing things, but they have two drawbacks. Firstly, they are big. Well, tall. They take up a lot of space and whatever you put in them would end up jumbled together. Secondly they have a lip around the inside just below the top. This is to help in levelling the scoops of food so that they are all the same volume. It makes the tins less useful, though as the lip just gets in the way. So, what to do? i decided to chop them down to make them shorter:


I'm going to make a few different heights of tin, for storing different sized items.

Sunday, 24 December 2017

I bought a Casio fx602p and found a puzzle

I bought a Casio fx602p and found a puzzle

Well, it might be a puzzle, or it might be a coded shopping list, or something completely ordinary. It's a puzzle to me though.


The numbers don't appear to all be primes, so I don't think the calculator was used with a program to find primes. The other card doesn't have all the letters of the alphabet on it, so can't be used to code words. At least it can't code all words.

Here's the cards in close-up:


What are they for?

Friday, 15 December 2017

Festive

In the spirit of the season one of these was created:


Six millimetre plywood cut on the bandsaw and hand finished. Screwed together, so easily serviced in the future.

Tripod Fix Adjustment

I fixed my tripod a while back:

https://trochilidae.blogspot.co.uk/2016/01/tripod-fixed-ive-printed-two-new-clamps.html

The clamp works by pressing onto a small rectangular block which stops the leg from collapsing. The 3D printed clamp wasn't quite the same size as the original on one of the clamps, so it didn't push very hard on the block. this meant the leg wasn't very firmly held when extended. Eventually the clamp slipped over the block and I lost it.

So I machined a new larger block out of nylon. This has fixed the problem and the clamp is now very firm when latching the leg.


Friday, 8 December 2017

Miele Induction Hob Problem

Miele Induction Hob Problem

We've had a Miele KM5731 for nine years or so, it took a while for me to fit it after we bought it, so it's probably been installed for more like 8 years. Anyway, a few days ago it started to give an error code of FE32.This is the hob, it has four induction coils and some touch buttons:


The error code appears in the power level displays:


Once the error code appears the hob is unusable. The instruction manual isn't much help, it says turn it off and on again. Well, that might work, but it's got progressively harder to conjure away over the past few days. A search on the internet resulted in many useless sites and one very useful Dutch site. From that site it transpires that there are a couple of capacitors on the power PCB that can pop and lead to this error code. I took the hob apart and had a look and indeed there were two capacitors with bulging tops.

They are both 470uF 25V electrolytics, this one has split and opened:


This one has just expanded on top:


I ordered some new high quality capacitors to replace these two and also some to replace the other electrolytics on the PCB. These arrived today and I have replaced the capacitors. So far no sign of FE32, but we'll have to see over the long term whether it's fixed or not.

Interestingly the decent quality (Panasonic) capacitors I ordered were identical to the ones fitted, except for the date code, apart from the two that had popped. So it looks like maybe there was a supplier issue with those two.

UPDATE 13th February 2018
So far there's been no re-occurrence of the problem, so it looks like the capacitors were the problem.

UPDATE 25th March 2021

I have made a video of the disassembly of my hob, it's here:

https://youtu.be/MCJaZrRvgdE


Thursday, 30 November 2017

Remade Bag

I was asked to remake a bag a while back. The original was made of thin nylon type material.


The material for remaking the bag is on the left. It's an old curtain and is considerable thicker than the original. I took the handle off and unpicked the bag to make a pattern. Then stitched it all up again.


The bag just fitted in the material available, so I'm hoping it's big enough. I think I've made it a little bigger than the original. We'll see.


Tuesday, 28 November 2017

Zip

A while ago we bought a changing bag for the ongoing project. It was pretty cheap on ebay as it had a broken zip. At the price it was going for, about a tenth of retial price, it was worth it. It looked like the zip was fixable as it had just pulled away from the bag in one place.

After a quick fix we started using the bag, and found that the zip had pulled away as it had failed. the zip wasn't very smooth in that area and needed to be pulled harder in that area, which led to a failure.

Plan B was a new zip. Off to ebay again and a few quid later we have a new zip. Yesterday I finally had a slot available to get the sewing machine out.

Removal of old zip:


The new zip was then sewn into the bag:


The internal piping was re-attached which tidies up the zip edges:


Bag now usable. We just have to see how long this fix lasts...

Friday, 24 November 2017

Broken Keyboard

To control the Maslow I use a wireless keyboard, which is very useful as I can operate the Maslow at close quarters rather than being tethered by a keyboard cable to the control computer. Unfortunately I was using it recently and dropped it on the floor. This has happened beofre but this time when I picked it up and tried to use it, it wasn't working. It looked like the supply wasn't connected any more.


I took the keyboard apart and there was a dodgy looking inductor from the batteries to the PCB. I checkd with a multimeter and it was open circuit. I replaced it with a wire and checked. The keyboard started up and the keys worked, but the trackball didn't work and the low battery LED filckered. So it looks like the inductor is necessary to smooth out the supply voltage or help with transients. I didn't have any inductors, at least 100uH ones.
I chipped the paint off the inductor and found a ferrite core. The problem was the connection to the windings. The core seemed sound so I got some wire (the same wire I used when connecting the eMMC chip to the USB adapter) and rewound the inductor:


This fixed the keyboard, the trackball now works well.


Saturday, 28 October 2017

More Maslow

More Maslow


I tried a test cut on the Maslow recently and had a problem. The plywood circles I cut out before for the filament reel were cut fine. The new test part was a chair leg cut from scaffolding board. As the board is 36mm thick many passes are required to cut the part as I didn't fancy a full depth cut. The problem showed itself as a dropped USB connection. This stops the cut and I had to re power the arduino to get a link back. After some experimentation it looked like the router is generating noise that kills the USB connection. It also seem to very comprehensively kill the WiFi too.

I tried a main filter on the Maslow and computer but that didn't work. Trying to use an old-ish laptop also didn't work as the ubuntu was too old for the software, so that was out. next stop was the purchase of a proper line filter.


This allowed me to cut the entire part (which took about an hour) without a dropped USB connection. I'm pretty happy that this has gone a long way towards fixing the problem, this part took a long while to cut and is one of the biggest ones in the chairs. I may want to cut an entire kit of parts in one go, which would be two of these and some other parts, but I may be able to do that with a deeper cut (especially if I buy a new cutter).

The  sled had to have outriggers added so that it could be stable across the entire board. This worked pretty well too. You can just see them in this photo:


I'm not sure what I'll do if I try to cut from full width boards, this was a smaller board cut from a larger one. I may need outriggers over the top of the sled, or maybe the wider board won't require outriggers on the sled. We'll see.


Wednesday, 4 October 2017

Maslow Update

Maslow Update

The Maslow is now together:


This morning I moved the motors forwards so that the chains are more parallel to the work surface. Hopefully this will stop the chains jumping on the sprockets when I start cutting thicker material.

The router I am using is quite top heavy and this causes the sled to tend to tip backwards, especially if the router bit it out from the work surface. at the moment I'm putting a rod of steel on the top of the sled as a sort of counter weight. It works, so I'm happy at the moment.

I have made the first 'thing' using the machine:


Well, OK, it's the parts for a thing, not a thing, but this is the sort of thing the Maslow was for. Big plywood things. At first anyway, maybe big scaffolding board things later. These parts are going to be a filament reel for the 3D printers. I've made them manually before and this was way quicker. And I can do something else while the parts are cut out.

The calibration was a bit out before I moved the motors. I'll have to re-calibrate now the motors have moved, but hopefully I can get the calibration back to something as good as I had before. Those discs I made are slightly oval, but I'm hopng I'll be able to manually adjust that out on the next calibration.

The Z axis mount works remarkably well, considering the wood isn't actually attached to anything, it's just wedged in there.


I may have a go at 3D printing a replacement for the wooden version, but this works, so I'm in no hurry.


Tuesday, 26 September 2017

Prototype X-Y Table

 The new microscope came with a nice XY stage, but the slide holder was missing. I made one from a cheap XY table. The XY stage is manual, which is fine for adhoc looking at dies, but for photographing dies and then stitching photos there's a lot of photos. It's tedious doing it manually. So I prototyped an XY table from DVD drive stepper motor assemblies.


I had an arduino and two stepper drivers, so connected it all up;
The result is here, the two stepper drivers are being driven with the same signals.


And another view.


I'll have to make a stage block with a dovetail to mount this on the microscope. I may also remove material from the top table as it could do with being a bit lighter.


Wednesday, 20 September 2017

New Microscope

I've been looking at a lot of ICs under my microscopes recently, and realised that it was a way that I could do better reverse engineering. This will let me look at the ICs on a PCB without datasheets, so the PCB could possibly be re-used.
Reverse engineering the IC is an interesting thing in itself, as well.

So, I had a look on ebay and bought a metallurgical microscope. This has a lighting system that can illuminate a subject from the top, so it works on opaque samples like ICs.


It came with no objectives, so I'm now hunting for decent objectives for it. It has a proper X-Y table which is good for moving samples about. This is especially useful for die-shots which are large arrays of photos.

The USB microscope is still useful for soldering and so on, as this microscope has a working distance from objective to sample of between about 0.5mm and 10mm. That's not a lot of room for soldering!

The X-Y table didn't have a slide holder so I bought a cheap X-Y table mechanism on ebay and used some melted down food trays cast into an ingot :


After machining into a block, I drilled some holes and mounted the slide holder from the cheap XY mechanism:


So I now have a nice spring loaded slide holder:


It's not perfect, and has a bit of a broken drill in it, but it's decidedly better than my first attempt:


Thats a bit of sheet metal bent into a holder shape. It's much better now.

Next projects are a camera mount and an LED based illumination source.


Saturday, 2 September 2017

Maslow L298 Failure

Maslow L298 Failure

My Maslow motors stopped working, so I removed the IC from the PCB, decapped it and had a look. One of the transistors has overheated, maybe shorting some rails out:


For reference, the full chip looks like this:


Tuesday, 29 August 2017

From Scrap to Rings...

Starting with some leftover wood, I found some circles inside, using the bandsaw:


 It turns out that there were quite a few circles in that bit of scrap:


The circles stack quite nicely too...


I found some holes in the middle of the circles, as well...


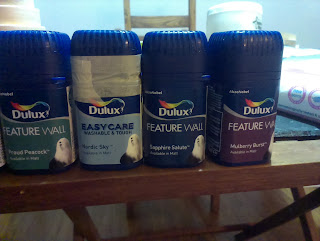
We chose some colours and bought some sample pots


and went multicolour.


Saturday, 26 August 2017

Maslow Update

A short update of the Maslow. I've added the Z axis drive using a piece of wood, I'm planning to 3D print a thingie to replace the wooden prototype.

Unfortunately, while testing the Z axis I drove the motor into a jammed z axis screw and overheated one of the motor controllers, so I now have a Maslow that only has one motor drive.
I'm going to have to remove the drive chip and put a new one on...

Sunday, 13 August 2017

Maslow Arrival
 
My Maslow CNC router kit has arrived, so I have been making a frame for it. The frame is a one-off that fits on a wheeled trolley I made a while ago for sheet material storage. The dimensions seem to be absolutely correct for a Maslow frame, strangely, as I didn't build it with the CNC machine in mind.
The kit looks like this after it has exited the box.


The frame so far is a double A frame with some chipboard flooring for a sacrificial routing surface. (It's really cheap, which means it is comfortably sacrificial).


The A frame is constructed similarly to the standard Maslow frame, and I'm keeping the dimensions very similar even though I will be using smaller plywood sheets than the 8 x 4 foot sheets Maslow was designed for.
 
I'm planning on putting triangular motor mounts on the cross beam, hopefully they will be rigid enough for the motor/chain stresses. If not, then I'll look at a single beam across the top and supports. I'm using up a lot of material I have hanging around, hence a different design and varied materials.
 
3D Printing Failure
 
While attempting to make one of these:

I made one of these:

Shame it's not as useful.


Friday, 4 August 2017


A Bit of Leather Work

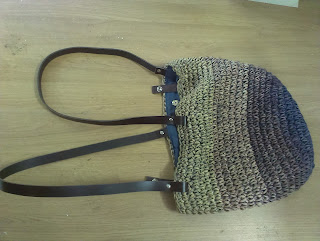
I made some new straps for this bag, using leather rather than a plastic version of leather that was originally used.


One of the original straps had just worn out:


While I was doing work on the bag, I also replaced the popper that was on a closing strap with a new one, as the old one had been bent out of shape:


Thursday, 13 July 2017

Canopy Fitting Fix

The canopy fitting that I remade in nylon was taken to Italy and tried out. The pivot bolt and nut were fouling on the part that this remade part fits into, so I have dropped the bolt and nuts by counter-boring the holes:


I used a 20mm Forstner bit to do this. The bolt and nut are now much lower and hopefully should easily clear the
other part:


I bought some stainless bolts, nuts and washers as I realised that the canopy is going to be used by the sea, and the original bolts were maybe not going to weather sea water exposure very well.

Wednesday, 12 July 2017

Distance Increaser

When washing nappies in the toilet it's always nice to have a distance increaser, or, to give it it's Latin name: A Pair of Tongs.
They keep your hands away from the juice found in toilets and allow movement of nappies without the brown tipping of fingers.

These can be made out of wood, and when made quickly out of offcuts of wood and a homemade hinge (old PC case) they tend to be crap.

When remade (from the same materials) they can be a lot better.


Special slider that stops the ends from missing as the tongs twist:


DIY hinges as the hinge pot was empty (made from old PC case sheet material):


In between the wooden bits, there's a spring, held captive by the slider:


It works a lot better.