Search This Blog

Sunday, 25 October 2015

Shutters

The new shutters for the workshop rooms are now fitted. Fitting wasn't too difficult, but the shutter curtains themselves are pretty heavy.

The large shutter up...


and down...


In the down position the shutters protect the doors from any bits and pieces that may get flung about by machinery (it happens now and again...).

The smaller room has a shiutter too, this is up:


and this is down:


Not much gets flung about in the small room, but they are useful for security.

I had to pack the shutters out by 20mm in order to clear the door handles, that was pretty simple. They take up very little space, the main space taken up is above the doors and that isn't particularly useful space anyway.


Thursday, 15 October 2015

Knobs

One of the storage heaters has had a broken knob for quite a while now. It's easy to work around as there's two on the heater, and I can swap one for the other when I need to adjust one of the settings that the broken knob is attached to.
Anyway, time to see if I can print a new pair of knobs as a fix.

Old knobs:


The new knobs are in grey and have a similar but simpler design. I needed a pointer mark, so used a sharpie, but I could have put a recessed shape on one end of the cross piece, having thought about it.


This is them in operation, and they do fit and work pretty well:


Wednesday, 14 October 2015

Jasper Trial Trial
Of course, in the process of making a jasper trial tray it is necessary to perform some trials in order to test various ways of making things. So, you end up with several trial pieces for different trials in the tray you are reproducing. And what do you do with these trials?
You build a trial trial tray.


These trial pieces have some of the writing that is on the original pieces (the Wedgwood museum was kind enough to send me a high resolution picture of the tray so I can determine what the text says for all pieces). I trialled different ways to write the text.
The numbers are stamped with number punches from a 5mm set ( I have ordered a 6mm set as these numbers are too small for the full size trials).
The colours are not correct in these pieces, colour is difficult to reproduce accurately, anyway.

The box for the tray is a trial, too, this is what the full size box will look like, stained this colour too.


Woodrat Template Routing

When making chairs, I am going to be making a lot of tenons, so I thought a way to template route on the Woodrat would be a good idea. There is the new Pathfinder, but it seems a bit elaborate for me, mainly due to it having to be able to do a large range of templates.
If you have a 3D printer then it's pretty easy to print a template specifically for each job, then you don't need a template grid with all sorts of different tenons etc.

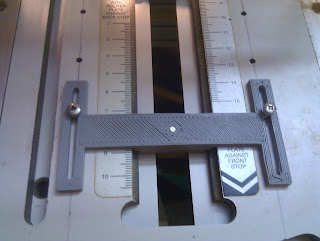
So, I am attempting to make a template routing setup for the woodrat. A plate of MDF is attached to the workpiece extrusion that moves left and right. A recess is routed in the MDF to allow different templates to be inserted. A pin is used to trace the template and it fits into a pin holder that is attached with slots so there is some front and back adjustment.

This is the bracket at the front of the underside of the router plate. It holds the end of the MDF plate that is nearest the user.


The far end of the MDf plate is held with two brackets that slide in the extrusion slots. They are held with M4 hex head bolts attached with butterfly nuts so they can be tightened easily. This provides the left/right adjustment of the template so it can be aligned with the workpiece.


The template itself sits in a recess routed into the MDF:


There's a couple of tabs on the template which are used to attach the template firmly with a couple of screws. The tenon in that photo was cut with the template fitted.


The pin holder is attached to the router plate and has front/back adjustment.

I need to improve the stiffness of the pin holder and make a proper pin that has less friction than a bolt with a thread on it.

I also need to make a similar system that works on the mortice rail that I made so that I can cut repeatable mortices in the chair legs.
That will need a new pair of brackets and maybe a new MDF plate.